Claude Code
Claude 101 — Session 3

Build It Once.
It Runs Forever.

You've been asking AI for help. Today you learn to make it build things — real tools, real systems, real pages — that run permanently inside your business.

Claude Code · Kaizen Collective · April 2026
01 — The Evidence
You're Looking at It
This page is the proof. Not a mockup. Not a concept. The real thing.

This page — the layout, the typography, the navigation, the responsive design, the deployment to a live URL — was built with Claude Code. Not by a developer. Not by an agency. By someone describing what they wanted in plain English.

That's not a demo. That's the point. The teaching tool and the evidence are the same thing. You're reading the proof while you learn how to make your own.

code.kaizencollective.com.au
This page is both the lesson material and the proof it works.
Built with Claude Code
02 — The Three Modes
Same AI. Different Capability.
You've already used two of these. The third one changes what's possible.
Session 1
Chat
You do Ask questions
Claude does Answers
What remains A conversation
Session 2
Cowork
You do Give instructions
Claude does Executes tasks
What remains A document
$ claude › building...
Session 3 — Today
Code
You do Describe outcomes
Claude does Builds systems
What remains A running product

Chat is a conversation. It's useful, but when the window closes, it's gone. Cowork is delegation — you point Claude at a task, it executes. Better. But still one task at a time, one document at a time.

Code is different. You describe what you want to exist — and Claude builds it. A landing page. A reporting tool. An automated system that pulls data from your platforms every morning and sends you a summary before you've finished your coffee. You don't write the code. You describe the outcome. Claude writes it, runs it, tests it, fixes it, and delivers a finished product.

03 — The Mantra
Think Once, Deliver Often
Every system you build becomes infrastructure. Every decision compounds.

When you build a design system, every page after it inherits your brand. When you build a reporting tool, every morning after that the report runs itself. When you build a client onboarding flow, every new client after that gets the same experience without you lifting a finger. One decision. Permanent leverage.

BUILD ONCE LANDING PAGES Branded, deployed, live DAILY REPORTS Pull data while you sleep AUTOMATIONS Onboarding, follow-ups, CRM EMAIL SYSTEMS Sequences in your voice DASHBOARDS Client health, metrics, alerts RUNS FOREVER

Chat taught Claude who you are. Cowork taught Claude what to do. Code teaches Claude how to build.

01 — Earn While You Learn
The Old Path Is Dead
You don't need a computer science degree. You need clarity on what you want — and that's the skill you've been building your whole career.

The old path to building software: spend 3–4 years in a degree learning theory, then spend years in junior roles before you can build anything useful. Your first lesson? Print "Hello World" on a screen. Thrilling.

With Claude Code, you learn by building real things — tools your business actually needs, right now. A dashboard that tracks your leads. A landing page that converts. An onboarding system that runs without you. Every build teaches you something new about how software works, and every build creates something that earns for your business immediately.

You don't need to understand how an engine works to drive a car. The learning happens as a byproduct of the building. You'll pick up terms, patterns, and concepts naturally — because they're attached to things you care about, not abstract exercises.

With a Developer
Landing page 1–2 weeks · $2–5k
Client dashboard 4–8 weeks · $5–10k
Email system 1–2 weeks · $1–3k
Operations tool 6–12 weeks · $8–15k
Design system 2–4 weeks · $3–6k
Typical total $24–53k
With Claude Code
Landing page 1–2 hours
Client dashboard 2–4 hours
Email system 1–2 hours
Operations tool 3–6 hours
Design system 1–2 hours
Typical total A weekend

The cost difference is real, but the time difference is what matters. A developer builds on their timeline. Code builds on yours — while you watch, while you iterate, while you learn. And you own every line of it.

02 — The Build Process
Two Steps. That's It.
You don't need a project manager, a sprint board, or a Jira ticket. You need a plan and a builder.

The workflow is simple. Use Chat to think — brainstorm, strategise, map out what you need. Then hand the plan to Code and let it build. One context handoff. No back-and-forth with a developer over six weeks. No design review meetings. No scope creep invoices.

Chat creates the brief. Code executes the brief. You review the result in real time and iterate on the spot. What used to be a procurement process is now a working session.

YOUR IDEA Plan in Chat Think · Strategise · Brief STEP 1 HANDOFF $ claude Build · Test · Fix · Deploy STEP 2 Working Product Live on the internet DONE iterate

The key distinction: Chat creates a brief — a clear description of what you want. Code reads the brief and builds it. You review the result in real time. If something's off, you describe the change and Code fixes it in seconds. The iteration cycle that takes weeks with a developer takes minutes with Code.

03 — CLAUDE.md
One File. Every Build.
The reason Claude Code doesn't build generic output — it already knows who you are.

CLAUDE.md is a single file you write once. It tells Claude Code who you are, how your brand sounds, what your colour palette is, how you talk to clients, what your business does. It's Claude's memory — but unlike Chat's automatic memory, you control every word.

Once it exists, every build inherits it. A landing page comes out in your brand. An email sequence sounds like you. A client report uses your terminology. You wrote the identity once. Everything that follows is already personal.

This is what separates Claude Code from asking a developer to build something. A developer needs a brief every time. Claude Code reads your CLAUDE.md and already knows the brief.

CLAUDE.md Your identity · Your brand Your voice · Your rules LANDING PAGES In your brand, every time DASHBOARDS Your metrics, your layout EMAIL SYSTEMS Sounds like you wrote it REPORTS Your terminology, your KPIs CLIENT TOOLS Built for your workflow AUTOMATIONS Knows your systems WRITE ONCE · POWERS EVERYTHING
Common Questions
Before You Ask
The questions that come up every time. Answered once.

What's the difference between Code and Cowork?

+

Cowork runs inside a virtual machine — a simulated computer inside your computer. It can handle files and one-off tasks, but everything disappears when the session ends. Code runs directly on your machine. It builds real software that stays. A dashboard built in Code is still running next week. A document produced in Cowork needs to be rebuilt every session. Code creates assets. Cowork performs tasks.

Do I need to know how to code?

+

No. You describe what you want in plain English. Claude writes the code, runs it, tests it, fixes it. You'll pick up terms naturally — the same way you learned marketing vocabulary by doing marketing, not by studying a textbook. The skill you need is clarity on what you want. That's a business skill, not a technical one.

What does Claude Code cost?

+

Claude Code requires a Pro ($20/month) or Max ($100/month) subscription. Pro gives you generous usage for most builds. Max is for heavy use — complex projects, extended sessions, lots of iteration. Start with Pro. You'll know when you need Max because you'll hit the usage limit mid-build and won't want to stop.

Can Claude Code break my computer?

+

Extremely unlikely. Claude works inside project folders and asks permission before making changes. It doesn't touch system files. The worst case is it writes code that doesn't work — and then you tell it to fix it. Everything it creates is tracked through Git, so you can always undo.

What's the trust flag everyone mentions?

+

By default, Claude asks permission before every action. The trust flag tells Claude to just work without asking. The name sounds scary on purpose — it means you trust Claude to act on your machine. For building new projects, it's what you want. For editing critical files, keep the default.

What's CLAUDE.md and why does it matter?

+

A file you write that tells Claude Code who you are. Your brand, your voice, your rules, your preferences. Think of it as a permanent brief. Without it, Claude starts every project from zero. With it, every project already knows your business. You write it once, and every build inherits it.

Can I use what Claude builds commercially?

+

Yes. Everything Claude Code builds belongs to you. The code, the design, the deployed product — it's yours. No licensing restrictions on output. You own every line.

What if it builds something I don't like?

+

Tell it. "I don't like the colour of the header" or "this section feels too busy" or "start over on the hero." Claude iterates in seconds. The power isn't in getting it right the first time — it's in how fast you can iterate. What takes a developer days of back-and-forth takes minutes.

Three ideas. That's all you need before you build. It pays for itself while you learn. The process is two steps. And Claude already knows who you are.

03 — The Set Up
Get Set Up
This takes about 30 minutes. Put a podcast on, grab a coffee, and knock it out in one sitting. Each phase builds on the last — by the end, you'll have a fully loaded AI building tool that already knows your business.

What you're about to do

You're going to complete 4 phases. Each one builds on the last:

1.

Install Claude Code — so Claude can run on your Mac and actually build things

2.

Set Up Your Workspace — so you have one app where you can see your files and talk to Claude side by side

3.

Teach Claude Your Business — so Claude already knows who you are, what you do, and how you work before every conversation

4.

Unlock Full Power — so Claude can build without stopping to ask permission after every step

How to read this guide

Tap the checkbox next to each step to check it off as you go. You'll also see coloured boxes throughout:

Grey boxes — explain what something is and why you need it

Amber boxes — something went wrong? These tell you how to fix it

Red boxes — important warnings. Read these before you continue

Green boxes — phase complete. You're ready for the next one

Phase 1
Install Claude Code
Get Claude Code running on your Mac

Open Terminal

Press Cmd + Space, type Terminal, hit Enter.
What is Terminal? It's the text version of your computer. Instead of clicking buttons and dragging files, you type short commands. It looks like a hacker movie — that's normal. You'll only need to paste a few commands into it.
macOS Terminal window — this is what it looks like when you first open it
This is what Terminal looks like. Not as scary as it seems.

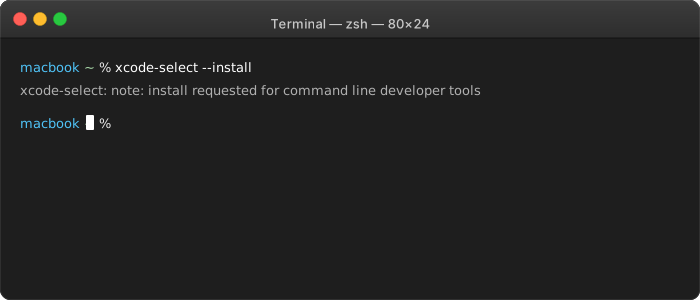
Install Xcode Command Line Tools

Paste this into Terminal and hit Enter:

xcode-select --install
What is this? These are background tools that let your Mac install and run developer software. You'll never open this directly — but your Mac needs it before anything else will work. Think of it as laying the foundation before building the house.
  • A popup will appear — click Install
  • Wait 5–10 minutes for it to finish
  • When it's done, paste this to verify: xcode-select -p — it should show a file path
Already installed? If you see "command line tools are already installed" — perfect. Skip to the next step.

Install Node.js

Go to nodejs.org and click the big green button that says LTS. Download it, open the installer, and click through the steps.
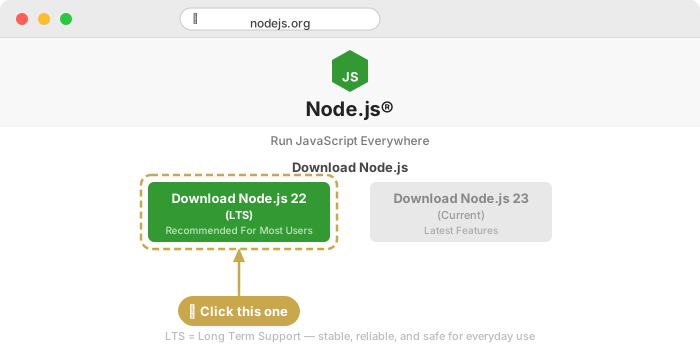
nodejs.org download page — click the green LTS button
Click the green LTS button — ignore the other one.
What is Node.js? It's the engine that runs Claude Code. Like how your car needs petrol to drive, Claude Code needs Node to run. You'll install it once and never think about it again. LTS stands for Long Term Support — it just means "the stable, recommended version."
  • Once installed, close Terminal completely (Cmd + Q)
  • Reopen Terminal (same way — Cmd + Space, type Terminal)
  • Paste this to verify: node --version — you should see a number like v20.x.x or higher
"command not found"? Close Terminal completely with Cmd + Q (not just the window — quit the app), reopen it, and try again. Still nothing? Restart your Mac and try once more.

Install Claude Code

Paste this into Terminal and hit Enter:

npm install -g @anthropic-ai/claude-code
What is npm? It's Node's app store. This command downloads Claude Code from the internet and installs it on your Mac. You'll see a progress bar — wait for it to finish.
  • When it finishes, you'll see something like added 3 packages in 3s — that means it worked
  • You might also see messages about "packages looking for funding" — ignore those completely
  • Stay right where you are — don't close Terminal. Just type this next command and hit Enter: claude --version
  • You should see a version number — that confirms Claude Code is installed
"permission denied" or "EACCES" error? Your Mac is being protective. Run this instead:
sudo npm install -g @anthropic-ai/claude-code

What is sudo? You're telling your Mac "I'm the owner, let this through."
Important: the password is invisible. When Terminal asks for your password, type your Mac login password and hit Enter. Nothing will appear on screen while you type — no dots, no stars, no characters. It looks like nothing is happening. That's a security feature, not a bug. You ARE typing. Just type it and press Enter.
"Sorry, try again"? You typed the wrong password. Remember — nothing appears while you type, so it's easy to mistype. Take a breath, type your Mac login password slowly and carefully, then hit Enter. You get 3 attempts before it locks you out. If it locks you out, just run the sudo command again and try once more.
"2 packages are looking for funding"? Ignore this completely. It's not an error — it's just npm mentioning that some open-source projects accept donations. You don't need to do anything.
"claude: command not found" after install? Close Terminal with Cmd + Q, reopen it, and try claude --version again.

Sign In

Type claude and hit Enter. The first time you run this, Claude will walk you through a few quick setup screens:

  • Theme picker — it asks which text style looks best. Just pick 1. Dark mode (it's already selected) and hit Enter
  • Syntax theme preview — you'll see a coloured code sample. Don't worry about this — just hit Enter to accept the default
  • Sign in — it will open your browser. Sign in with the same claude.ai account you use for Chat. You'll see a "Build something great" page — that means it worked. Go back to Terminal
  • Trust this folder — Claude will ask "Is this a project you created or one you trust?" Select 1. Yes, I trust this folder and hit Enter. This is just Claude confirming it's safe to work in this folder
  • You should now see a prompt where you can start typing to Claude
All of these first-time screens only appear once. The folder trust question may appear again if you open Claude in a new folder for the first time — just select "Yes, I trust this folder" each time.
Browser didn't open? Look in Terminal for a URL — copy it and paste it into your browser manually.

First Test

Let's make sure everything works. Paste these two commands one at a time:

cd ~/Desktop claude

Once Claude is running, type this:

Create a file called hello.txt that says Claude Code is working
  • Check your Desktop — if hello.txt appears, you're live

Phase 1 complete — Claude Code is installed and running on your Mac.

Phase 2
Set Up Your Workspace
Install VS Code — the app you'll actually work in every day

Download VS Code

Go to code.visualstudio.com and click the big blue download button for Mac.

What is VS Code? It's a workspace app where you can see your files, write instructions, and run Claude Code all in one place — think of it as Claude Code's office. It's free, made by Microsoft, and used by millions of developers. You're about to be one of them.
  • Open the downloaded .zip file
  • Drag Visual Studio Code into your Applications folder
  • Open it from Applications

Quick Orientation

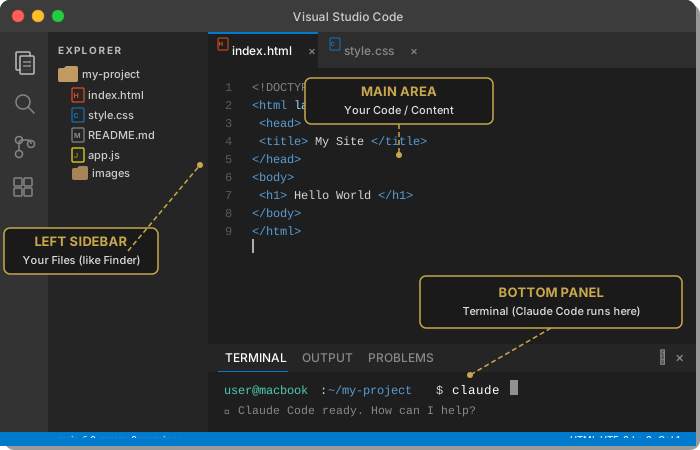
VS Code looks overwhelming at first. Here's all you need to know:

  • Left sidebar = your files (like Finder)
  • Bottom panel = Terminal (where Claude Code runs)
  • Top menu = everything else
Don't worry about all the buttons. You'll use about 5% of what's here. The rest is for software engineers — and you don't need to be one.
VS Code interface — sidebar on left, editor in center, terminal at bottom
Your new workspace. Files on the left, Claude at the bottom.

Install the Claude Code Extension

Click the Extensions icon in the left sidebar — it looks like four small squares.
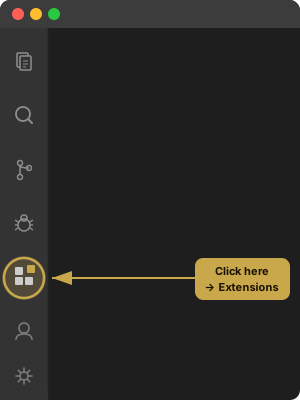
What are extensions? Add-ons that give VS Code new abilities — like apps on your phone. The Claude Code extension lets you use Claude directly inside VS Code instead of switching to Terminal.
VS Code activity bar with Extensions icon highlighted
Look for this icon in the left strip — it's the Extensions marketplace.
  • In the search bar, type Claude Code
  • Click Install on the one by Anthropic
  • A Claude icon will appear in the left sidebar — that's your Claude Code panel

Open a Project Folder

Go to File → Open Folder and pick your Desktop, or create a new folder called something like My Projects.

What is a project folder? Just a regular folder. Claude Code works best when it knows which folder you're working in — it can see the files, understand the context, and build things in the right place. Think of it as giving Claude a desk to work at.

Run Claude Inside VS Code

You need to open the Terminal panel inside VS Code. This is at the bottom of the window — not the main editing area in the centre.

  • Go to the top menu: View → Terminal
  • A panel will appear at the bottom of VS Code. You'll see tabs along the top of it: PROBLEMS, OUTPUT, DEBUG CONSOLE, TERMINAL
  • Click the TERMINAL tab — this is the one you want
  • Click inside the Terminal area (you'll see a blinking cursor), type claude and hit Enter
  • Same Claude, same power — but now you can see your files and Claude side by side
There are 3 things that might look like "terminal" — only one is right.
Use this one → The TERMINAL tab in the bottom panel of VS Code. It looks like the Terminal app you used in Phase 1.
Not this → The Claude Code sidebar on the left (that's the extension — you can ignore it for now).
Not this → The macOS Terminal app you used earlier (you can close that now).
Don't type claude into a file. If you see your text appearing in the big centre area of VS Code with line numbers next to it — that's the editor, not the Terminal. You need the dark panel at the bottom of the screen. Go to View → Terminal to open it.
From now on, this is where you'll work. VS Code gives you everything in one window — your files on the left, Claude at the bottom, and the results appearing in real time. No more switching between apps.

Phase 2 complete — VS Code is your new workspace. Everything in one place.

Phase 3
Teach Claude Your Business
Give Claude a cheat sheet so it already knows who you are

Understand What CLAUDE.md Is

CLAUDE.md is a file that Claude reads at the start of every single conversation. It's your business cheat sheet.

Think of it this way: every time you start a new conversation with Claude Chat, you have to re-explain who you are, what your business does, and how you work. CLAUDE.md removes that entirely. Claude reads it automatically and already knows your business name, your services, your platforms, your brand voice — everything. The more detail you put in here, the less you explain later.
Choose Your Path

Pick the one that applies to you:

Path A: You've Done Your Business Profile in Chat

If you've already created a Business Profile document inside Claude Chat, you can use it to generate your CLAUDE.md automatically.

  • Open claude.ai → find your Business Profile conversation
  • Copy or download the Business Profile output → save it to your Desktop
  • Open VS Code terminal (Ctrl + `)
  • Type claude and hit Enter
  • Paste this prompt:
Read the file called [your-filename] on my Desktop and use it to create my CLAUDE.md file at ~/.claude/CLAUDE.md. Include everything relevant about my business — who I am, what I do, who I serve, my platforms, my brand voice.
Replace [your-filename] with the actual name of the file you saved — e.g. Business-Profile.pdf or business-profile.txt. Claude will read the document, extract the key information, and create the file for you.

Path B: You Haven't Done a Business Profile Yet

No worries — you can create your CLAUDE.md from scratch. Open VS Code terminal, type claude, and paste this:

Create a CLAUDE.md file at ~/.claude/CLAUDE.md with the following information about my business: - Business name: [your business name] - What I do: [your services/offers] - Who I serve: [your target market] - Platforms I use: [CRM, social, email, etc.] - How I communicate: [brand voice, tone] - Other context: [anything else that helps]
Fill in the brackets with your own details before hitting Enter. The more specific you are, the better Claude will understand your business. You can always update this file later — it's not a one-shot deal.

Verify It Works

Let's make sure Claude actually reads your business context:

  • Quit Claude — type /exit or press Ctrl + C
  • Start a new session: type claude and hit Enter
  • Ask: What do you know about my business?
  • Claude should respond with details from your CLAUDE.md

Phase 3 complete — Claude now knows your business before you say a word.

Phase 4
Unlock Full Power
Remove the training wheels

Understand What This Means

By default, Claude asks your permission before it reads a file, runs a command, or makes any change. That's responsible — but it's slow.

When you're building something new and you trust the process, you can tell Claude to just go. It's the difference between micromanaging a new hire and trusting a senior employee. Claude will plan the work, execute it, test it, and fix issues — all without stopping to ask after every step.

How to Use It

Instead of typing claude, run this:

claude --dangerously-skip-permissions
That's it. Claude will plan, execute, test, and fix — without stopping to ask after every step. A 20-minute build becomes a 5-minute build. The name sounds scary on purpose — it's a reminder that you're giving Claude more freedom. For building new things, that's exactly what you want.

When NOT to Use It

Don't use this when you're changing something critical that already works. Use it when you're building something new.

Think of it like this: you'd give a trusted employee the keys to set up a new office. You wouldn't give them the keys to rearrange your existing one without checking in first. New build? Skip permissions. Editing something important? Let Claude check with you.

Phase 4 complete — you're fully set up. Claude Code is installed, your workspace is ready, Claude knows your business, and you know how to build at full speed. Go to the next tab and build something.

Common Questions
Before You Ask
Quick answers to the questions everyone has

Do I need to know how to code?

No. That's the whole point. You describe what you want in plain English — Claude writes the code. You'll paste a few commands during setup, but you don't need to understand them. You just need to follow the steps.

Do I need to pay for VS Code?

No. VS Code is completely free and always will be. It's made by Microsoft and used by millions of people. There's no trial, no subscription, no catch.

Do I need a Claude Pro subscription?

Yes. Claude Code uses your Claude Pro subscription — the same account you use for Claude Chat at claude.ai. If you're already chatting with Claude, you're already paying for it. No extra cost.

What's the difference between Claude Chat and Claude Code?

Claude Chat is for conversations — ask questions, get answers, brainstorm ideas. Claude Code is for building — it creates files, writes code, builds tools, and deploys them. Chat is your advisor. Code is your builder.

What if I close everything and come back tomorrow?

Just reopen VS Code (or Terminal) and type claude. Everything you've set up stays installed. Your CLAUDE.md file stays saved. You don't need to redo any of this. Just pick up where you left off.

Can I break anything?

No. Claude Code works inside your project folder — it's not touching your system files, your apps, or anything outside the folder you're working in. The worst that can happen is Claude creates a file you don't want, and you delete it. That's it.

The Build

Your Design System.
Built Live.

You're about to build the foundation every future project inherits. Your colours. Your fonts. Your rules. As a real, working HTML page — in minutes.

Hands-On Exercise · Claude Code
Your First Project
A Design System
The foundation every future build inherits. Before you build pages, tools, or automations — you build the rules they all follow.

A design system is a single source of truth for your brand — your colours, your fonts, your components, your voice. It's not a nice-to-have. It's the reason every page you build from here looks like you instead of a generic template.

Without one, every new project starts from scratch. With one, every new project already knows your brand. You make the decisions once and everything built on top inherits them automatically.

This is what I built for myself — it covers colours, typography, components, page templates, even social media templates. Today you're going to build yours as a working HTML page you can open in a browser and reference every time you build something new.

figma.com/design — Mario Paguio Design System
Mario's Example
Cover · Colours · Typography · Components · Templates
Dark Forest + Cream + Warm Brass · Barlow Condensed + DM Sans · Sharp corners · Zero border-radius
Built with Claude Code

Yours will look different — different colours, different fonts, different vibe. That's the point. Same structure. Your brand. Let's build it.

Step 1 — Prep Your Files
Get Your Docs Local
Claude Code reads files on your computer. Your brand docs need to be there — not in Google Drive, not in Notion. On your machine.

Download your Session 1 brand documents — your business information, preferences, anything you've already decided about who you are and how your brand sounds. Put them in a folder.

Then open Claude Code. That's it — just type claude in your terminal and hit enter. Claude will handle creating folders, finding your files, and organising everything. You don't need to worry about where things go.

Start Claude Code claude

When you paste the build prompt in the next step, just tell Claude where your brand docs are — "my brand docs are in my Downloads folder" is enough. Claude will find them.

Step 2 — Make Your Decisions
Three Colours. Two Fonts.
If you already decided these in Session 1, use those. If not, decide now. Don't overthink it — Claude can change them in seconds.

Every design system starts with the same three colour roles. You don't need a palette of 20 colours. You need three that do specific jobs.

Surface

Your background. The canvas everything sits on. Dark and moody? Light and clean? This sets the entire tone.

Text

What sits on top. Needs to be readable. If your surface is dark, your text is light. Simple contrast.

Accent

Your one pop of personality. Buttons, highlights, the thing that draws the eye. Use it sparingly — that's what makes it powerful.

Two fonts. No more. One with character, one that disappears.

Display Font — Headlines
The One With Character

This is the font people notice. It sets the mood. Bold, condensed, serif, script — whatever matches your brand's personality. Used for headings only.

Body Font — Everything Else
The one that disappears

This font shouldn't be noticed. It should just read well. Clean, simple, invisible. Used for body copy, labels, buttons, navigation — everything that isn't a headline.

Don't know your hex codes? That's fine. Describe the colour — "dark forest green", "warm terracotta", "muted gold" — Claude will find the hex. Don't have a font picked? Describe the vibe — "bold and industrial", "elegant and classic" — Claude will suggest options.

Step 3 — The Prompt
Copy. Paste. Build.
This is the brief-to-Code handoff. Replace the fields in gold with your decisions. Paste the whole thing into Claude Code.
Build Prompt — Copy & Paste Into Claude Code
Read my brand documents at [path to your downloaded docs, e.g. ~/Downloads/my-brand-docs.pdf]

Then build me a complete design system as a single HTML page. Here are my decisions:

Business: [YOUR BUSINESS NAME]
Type: [WHAT YOU DO — e.g. "Pilates studio in Sydney"]

Colours:
- Surface (background): [DARK OR LIGHT — e.g. "dark forest green" or "#141F1B"]
- Text: [WHAT SITS ON TOP — e.g. "warm cream" or "#F5F0E8"]
- Accent: [YOUR POP COLOUR — e.g. "warm brass" or "#BFA278"]

Fonts (from Google Fonts):
- Display (headlines): [e.g. "Barlow Condensed" or "bold and industrial"]
- Body (everything else): [e.g. "DM Sans" or "clean and modern"]

Brand voice in 3 words: [e.g. "bold, grounded, precise"]

Build the HTML page with these sections:
1. A cover/header with my business name and "Design System"
2. Colour palette — show every colour as a swatch with hex codes and CSS variable names
3. Typography scale — show the display font at multiple sizes, then the body font
4. Components — buttons (primary + secondary), cards (dark + light), dividers, and labels
5. A sample hero section using my colours, fonts, and voice
6. A sample content section with cards showing my actual services or offerings
7. A footer

Create a DESIGN-SYSTEM.md file with all my brand rules as CSS variables.

Use zero border-radius. Sharp corners everywhere. Make it feel premium and intentional.

When done, start a local server so I can see it in my browser.

Replace every gold field with your own decisions. If you don't have an answer for something, describe what you want — Claude will figure out the rest. Then paste the whole prompt into Claude Code and hit enter.

Step 4 — Watch It Build
This Is the Moment
Claude reads your prompt, reads your brand docs, makes decisions, writes code, creates files, and starts a server. You watch it happen in real time.

When it's done, you'll see a URL in your terminal — something like localhost:3000. Open it in your browser.

Your brand. As a polished, working page. Colour swatches with hex codes. A typography scale. Buttons, cards, dividers — all in your colours, your fonts, your voice. Built in minutes. By you. Without writing a single line of code.

localhost:3000
Your Business Name
Design System
Colours · Typography · Components · Templates
Your brand. Live in your browser.
Step 5 — Make It Yours
Say It. See It.
Don't like something? Tell Claude. In plain English. It changes in seconds. Here are some prompts to get you started.

Click any of these to copy, or just describe what you want in your own words. There's no wrong prompt — if Claude misunderstands, just tell it what's off and it'll fix it.

"Make the hero section darker with white text"

"Change the accent colour to a warmer gold"

"Add a testimonial section with a quote from a client"

"Swap the feature cards for my actual services"

"Add my Instagram handle to the footer"

"Update the DESIGN-SYSTEM.md to match these changes"

"Make the typography scale bigger and bolder"

"Add social media templates — square posts for Instagram"

You just built a design system. Not a draft. Not a mockup. A live, working brand foundation that every future build inherits. That's Claude Code.